Are you interested in creating a website on your own? In this short course for beginners, learn how to build your website in 10 easy steps without any experience in web programming or CSS and html coding.
Whether you want to create a personal blog, a page for your company or affordable apartments, you can easily do all this using the right tools, resources and information.
This in-depth course contains all this in one place and will help you from the beginning from the end, so you no longer have to think about the cost of creating a website or spend money on agencies and web designers, or worse, learn.
If you’re a beginner, all you need to do is set aside some of your free time to complete this step-by-step guide and create a brand new website.
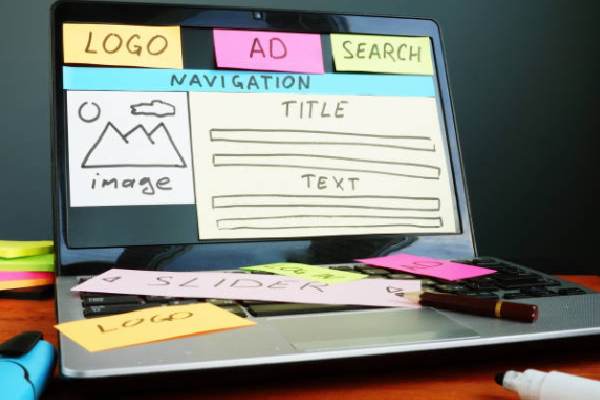
What does it take to build a website?
To make a fully functional website, you will need to provide 3 basic things to get started, namely:
These three things ensure that your site is fully accessible to others. Once you have registered a domain and selected a hosting plan, it’s time to install the WordPress platform.
WordPress is the most popular website building platform on the Internet, and installing and setting up is usually a simple process that takes a few minutes.
REMARK: in this guide we have taken the hosting company Godaddy as an example. There are a number of great hosting providers on the internet where you can build a site, like Bluehost or Hostgator that provide more or less equalquality service, but don’t worry, the build process is very similar on each of them.
So, ready? Let’s get started…
1. Define the purpose of your site
Before you start actual build, you should take some time to define and determine what the main purpose of your site will be.
There are different types of pages that you can find on the web, and they are published for different purposes.

Individuals, businesses and other businesses strive to achieve a greater presence on the Internet through websites that contain text use and multimedia data to convey their personal or business messages.
Content and design usually reveal the purpose or function of a particular site and they are usually classified into several categories, namely:
- Business – Almost all businesses today, whether large or small, have their own website online. In addition, it is a great tool for reaching a wider range of potential and existing customers.
- Marketing – A lot of websites concentrate on affiliate marketing and sales. Moreover, online advertising is displayed on a number of sites and is used to make money online. Companies typically prefer websites, blogs and social media profiles as an addition with the intention of promoting their brands to a wider range of people.
- Informative – Today, there are countless informative websites on the Internet. Information pages include those intended for specific types of information, such as how to perform a specific task or project and an online factsheet on a particular topic.
- Creative – Portals and blogs are also used to publish or display creative material. Visual artists, painters, directors and designers also publish their works online to present them to a global audience and earn them at minimal financial cost.
- Personal – There are individuals who create websites for personal reasons. Although some people use social media services to achieve an online presence, there are still those who prefer to post their content on their personal blog.
In any case, understanding the function of the site and planning in advance is very important to avoid any problems in the future.
2: Register with Godaddy
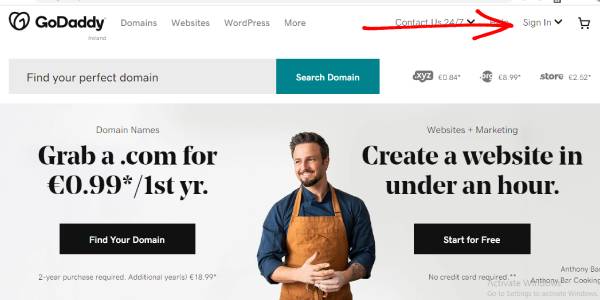
In the second step, having determined the main purpose of your site, you need to open a free profile on the Godaddy page.
Visit the www.godaddy.com and fill in the login details on the button located in the upper right corner of the screen.
Once you have completed the registration and confirmation process that takes 5-10 minutes, you are ready for the next step.
3: Select a domain name
Now that you have completed your application, it’s time to choose unique and a unique name for your website.
There is no secret formula for choosing the perfect domain name, but there are some basic rules that are worth adhering to when starting a website, namely:
- Relevance is key. Consider whether the domain name matches the title and theme of your site.
- Short and sweet. You want people to remember your web address, so the shorter it is, the better!
- Do not use numbers. It’s a bit tricky to have numbers in a domain name, because people don’t know if they’re going to type “3” or “three, for example.”
- Be unique! Make sure the domain has already been downloaded. It sounds obvious, but it saves time in the long run.
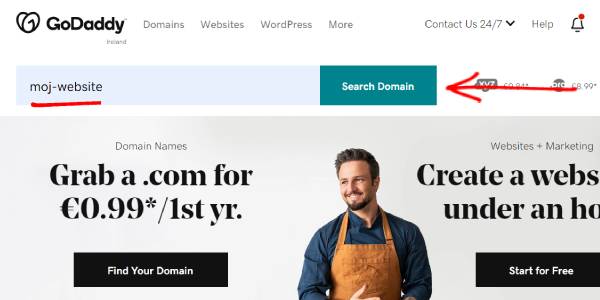
A domain name is a web address (url) that identifies your page in your internet browser. In this case, our example in the picture is “my-website”.
Simply type the desired name in the domain search bar in your account and click Search.
You can buy a domain name directly through your Godaddy account and usually costs about 10 euros a year, but if it’s your first you can get it for just 99 cents for the first year.
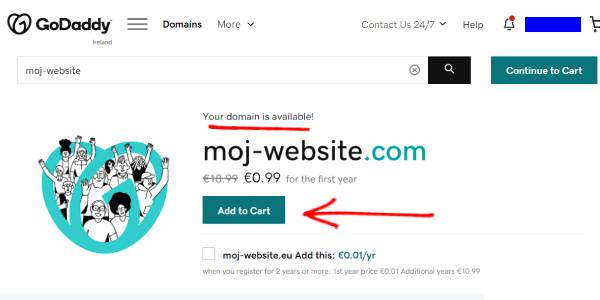
After you type the domain name you want, make sure the name is available. If the domain name you want to use is already taken, try choosing a different combination of words or something similar.
When you find a free domain name that works for you, add it to your cart and take the third step.
4: Choose a web hosting plan
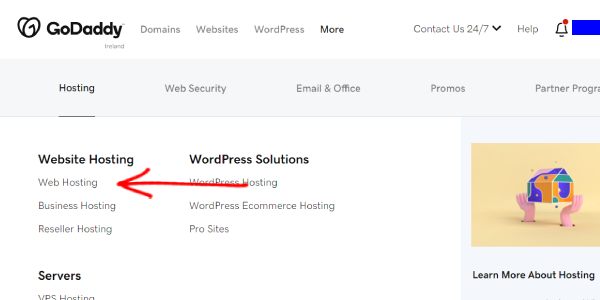
Once you’ve chosen a unique name for your domain, it’s time to choose the hosting plan that best suits your site’s needs.
Web hosting is a service that stores the files and contents of a website on a secure server that is always running and displaying. Without this component, the page will not be available to others to read and browse.
Affordable and reliable web hosting for new sites costs usually between 3 and 10 euros per month, depending on the amount of material you want to publish and the traffic you plan to receive.
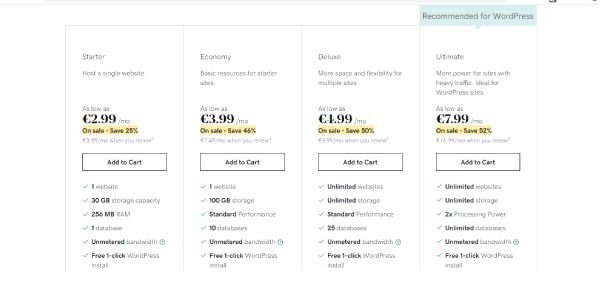
As you can see from the view, Godaddy provides four types of basic hosting plans for beginners and these are:
- Starter
- Economy
- Deluxe
- Ultimate
Each of these plans provides relatively good service for affordable prices. Once you’ve decided which hosting plan to use, you can start building a website.
5. Installing WordPress
Once you’ve purchased a domain name and web hosting, you’ll need to select and install a site building platform on your cPanel.
We recommend choosing WordPress because it is easy to use and contains thousands of free designs and plugins that make your website look professional and unique.
Setting up WordPress is easy and you can make it as follows:
a) Visit cPanel
Visit the cPanel section. Open a small menu next to your username in the upper right corner of your Godaddy account, and click “My Products”.
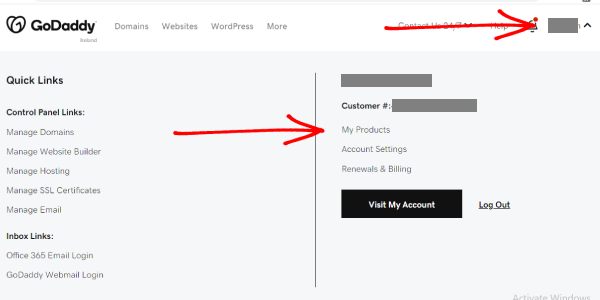
When you get to the page with your purchased products, go to the section of your hosting plan and click “Manage”.
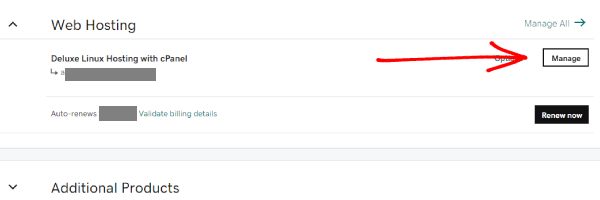
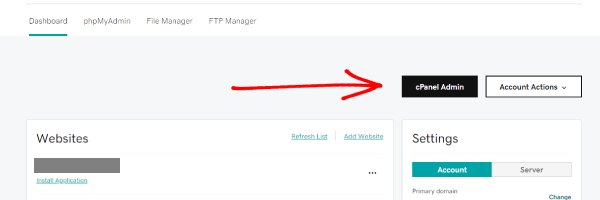
Then go to the “cPanel admin” button. After that, you will be redirected to your cPanel account where you can start building the site.
b) Add a domain
The first step at this stage is to add a domain to web hosting. You can do this by going to the “Addon Domains” section on your cPanel.
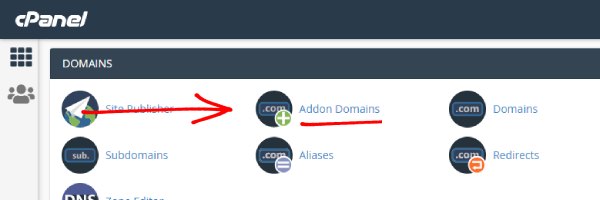
Open this section and enter your domain name and press “Add domain”. Now that you’ve added your domain, you can move on.
c) Create a MySQL database
In the next step, go to the “MySQL Database Wizard” section.to create a database for your site.
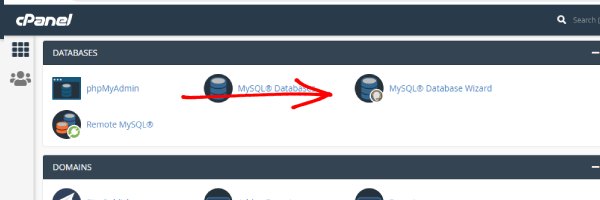
After you have completed creating the database by entering the necessary information, you can proceed to the next step.
d) Installation of WP platform
Now it’s time to install the WordPress app.
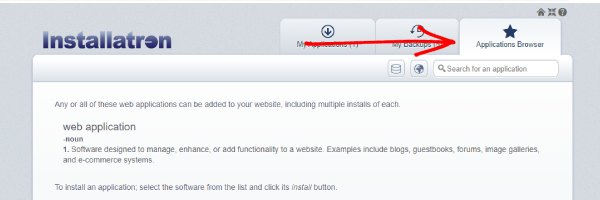
Also, on your cPanel administrator, find the “Installatron” section.
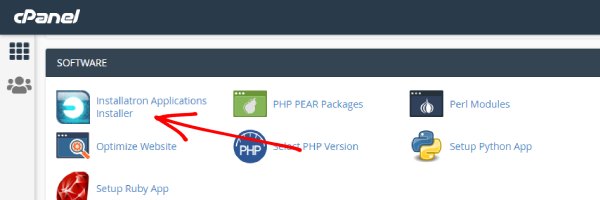
Installatron is a software that is used to install various web applications that you can use on the Internet. Open Installatron and click on the “Applications Browser” section.
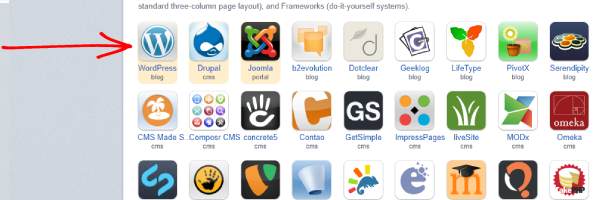
Now under the offered applications select WordPress.
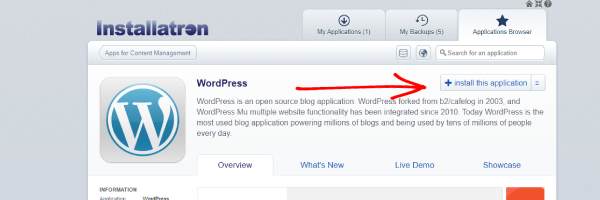
When you enter the application, click on the “Install this application” button. Then, mark the domain you previously entered and confirm the installation. Installation should not take more than a minute.
Congratulations, your WordPress website is alive!
Wait half an hour while the server processes the data. After about half an hour the page should be onlineand visible to others.
Now that you have completed all the necessary elements to set up the site, you can get down to the creative part of the job.
6. Customize the design and structure of the site
With your blank website that’s online, now is the time to choose a beautiful design, customize it, and add branding elements. You can start like this:
a) Choose a theme
WordPress themes are ready-made design packages that change the way your entire website looks. WordPress themes are replaceable – you can easily switch from theme to theme.
Go to your WordPress admin interface. You can find it on “moj-website.com/wp-admin”. Use the username and password you received during wordpress installation.
In the sidebar, go to “Themes → Add New.” Since there are really a lot of different popular themes to choose from, make sure you choose a light clean theme to start with that you can build on over time.
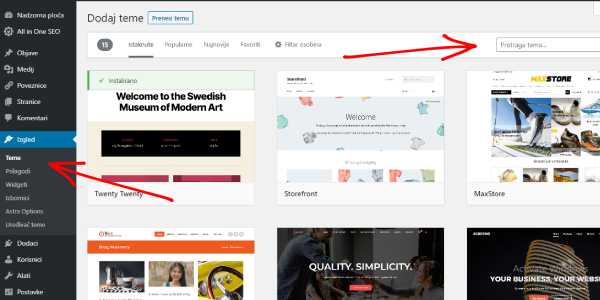
Our recommendation is the “Astra” theme.
Type “Astra” into the search engine and click “install”. After completing the installation, click on the “Activate” button, which will appear instead of the “Install” button. You’ll see a success message notifying you that the installation has gone as expected.
Now that you have installed the theme, you can start organizing categories.
b) Set categories
Categories can be very useful in organizing a website.
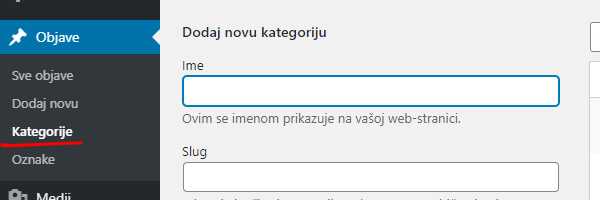
Categories group individual websites based on similar content or topic, and give the order and structure of the site’s content or its taxonomy.
Categories organize your content in a way that should make it easier for the user to find what they’re looking for, and category pages serve as an index of all pages and posts belonging to that particular topic.
You can also find the “Categories” section in the side menu in your WP admin.
c) Install Plug-In Plug-ins
Plug-ins are functional software that can be added to WordPress. They can expand functionality or add new features to the website.
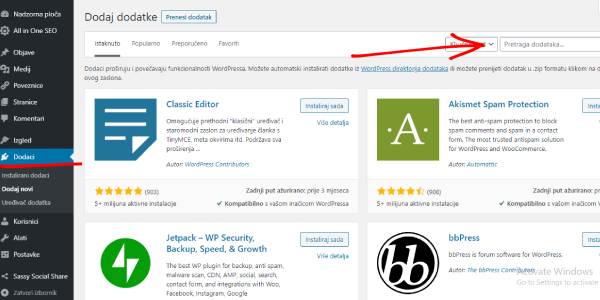
There are thousands of plugins available for free in the official plugin directory for WordPress.
Find the “Plugins” section of wp admin and install those that will benefit you for your online business. Some of the most popular supplements you might need to get started are:
- Jetpack – A platform for managing pages and statistics.
- XML Sitemap – Service for informing internet search engines about new content.
- Social Sharing Plugin – Plugin for social networks and sharing.
In addition to these add-ons, you will probably need some more, depending on what you do on the site. But you’ll already learn that along the way.
Let’s take the next step.
7. Create menus and navigation
Menus and navigation are a very essential part of any website. Navigation serves as a link that leads through web content with the aim of helping visitors more easily find the information they are looking for.
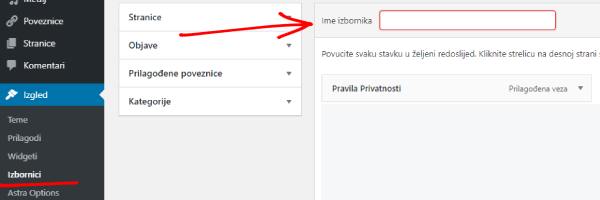
Here are some top navigation examples your site should include:
- Home page: This is your first impression. Explain who your company is and your values.
- Service or product: include one page for each major service or product line your company offers. For example, a bakery may contain cakes, cakes and catering sites.
- About us: A look at the history and the people behind your company. What is your founding story? What background do you want to share?
- Contact page: How can website visitors reach you? Your contact page may contain an online form, phone number, address, opening hours, and built-in Google Map.
- Privacy Policy: This is a page where you explain what information you collect from site visitors and what you do with it.
Likewise, categories can also be set as part of the menu. Depending on how you organize the trajectory of your audience’s movement through the site.
Once you’ve set up menus and navigation, you can now start posting content that will grace your site.
8. Enter web content
It’s time to get down to the business of writing and filling your site with media and digital content.
While the number of pages will vary drastically depending on your online business, each site should have several pages.
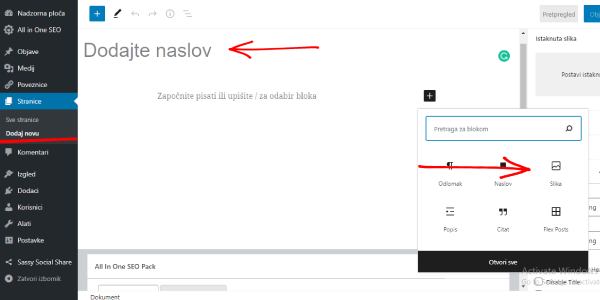
Open the “Pages” or “Posts” section (depending on what you want to publish), then click “Add new”.
Here you can createThe content is almost the same as in a word document. Also, you can add pictures, wrap text, add galleries, and more.
Keep in mind that users should not dig to find information. If a page is important, be sure to specify it on the Main navigation bar or footer.
9. Do SEO optimization
Once your site is available online, how will users find it? By optimizing and adapting it according to web browsers.
Most users find the necessary data by typing a search in a Google browser. For example, if you are interested in earning money online, you will type ” how to earn over the Internet ” in the search engine and get the desired ones, i.e. the relevant results.
For this very reason, Google uses more than 200 factors to determine which website should be displayed in search results. SEO optimization of the website will provide a greater chance of ranking better for the needs of your business .
The tools you use to optimize a website vary in nuances, and here are some to consider if you’re using WordPress. Download the appendix:
Learn more information on how to do SEO website optimization.
10. Test and publish the website
In the last step, all that’s left is to test and post content so they can see how the site looks live.
Once you are satisfied with the content created, you can start attracting audiences with various methods such as sharing on social networks, SEO optimization, paid ads, etc..
Building a website takes time and effort.
We’ve come to the end! Now that you have gone through all 10 steps you should have a framework insight into how to make a website. If you are a beginner, this will take you a little time before mastering everything.
Keep in mind that creating a website takes time, effort and work. There is no overnight success, but if you plan long-term with dedication, it is quite realistic to develop a profitable online business.
We believe it will take you a few weeks before you catch everything. But regardless, learn in progress.